Monday, April 5, 2010

Thrifty Knock Off Hemp Balls

So--I had been admiring THESE awesome decorative Hemp Balls from my most favorite Blog: Make it and Love it. AND so I went to go buy all the ingredients to make them--and everything was SO PRICEY!! Walmart wanted almost $3/Styrofoam ball!!! And the Hemp cording was almost $6.
So all of a sudden I changed my mind and decided I would try and live with out them.
Then--I happened to be in the hardware section of Walmart and saw this little bundle of JUTE. Not quite as nice as Hemp--but only $1.75.
I decided that maybe I could find a different round object to use instead of the Styrofoam.
I searched a little bit until I found these wiffle balls at the dollar store for 5 for $1.
So with Glue gun in hand--I started winding around and around and around and around...etc.


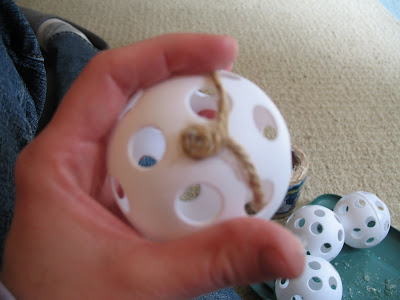
I just glued down all the jute and it went fine right over the holes too.

This project is a little time consuming as it really takes a while to go around and around those little guys! But it is a perfect project to sit and do while you watch a movie.

Here are some of the finished little guys WITH OUT their paint jobs.
I couldn't decide whether to leave them as they were or give them some color like the Make it and Love it gal did.
I decided to add color to a few of them and leave a few plain--so I could have the best of both worlds.
I didn't have any spray paint in the colors I wanted to I painted them with Craft paint that I already had.
And Viola---the finished project.

And isn't that a cute little pedastal they are sitting on? I found it at my favorite thrift store for $0.25!!! It was gold and I spray painted it!! I will post those before and afters soon!!


Linking up to:


The Shabby Nest Frugal Friday

Finding Fabulous: Frugalicious Friday

Thursday, April 1, 2010

Chair Redo--and Lessons Learned

SO--I went to my favorite little store--My friends Dollar Thrift Store (where EVERYTHING is $1) and found this awesome little chair. I thought it would make a PERFECT chair to sit at my sewing table.

Isn't it so cute? Doesn't it have potential? AND FOR ONLY $1!!! How can it go wrong?


So I figured I would just spray paint the thing white and redo the seat and VIOLA--it would be awesome. WELL--HERE COMES THE LESSON LEARNED WITH THIS PROJECT...

ALWAYS, I repeat, ALWAYS--prep your wooden surfaces before painting. I am not an expert at painting--so I did not sand this chair before starting--BIG MISTAKE!!! I primed and painted only to have the paint crackle and bubble and peel off!!! SO--then my hubby and I sanded it a little and did the whole thing over again! And learned another important lesson...

A little surface sanding OVER paint (if you haven't sanded properly in the beginning) does NOT FIX THE PROBLEM!!! How did I learn this you may ask? WELL--because after sanding it a little--we primed and painted AGAIN. Only to have the EXACT SAME PROBLEMS--CRACKLING and BUBBLING and paint coming off!!!

By this time I had used almost 2 cans of spray paint and 1 of primer on this little adventure. AND I had definitely used up all my patience!!! SO at this point I said I don't care anymore--lets give it one more light coat and call it good.

So here are the pictures of the seat re-do:

If you are adding batting to a seat while covering it--I recommend stapling the batting on separately instead of doing the fabric and batting all in one step. This way if you ever want to change out the fabric--you don't have to re-bat the whole thing.


And I didn't bother to take off the original covering because it wasn't going to hurt anything by keeping it on. I just cleaned it really good and stapled everything right over top!


So here is the finished project (don't look too close)--but as my dad always says--from the Post Office it looks great!


And here it is in my little sewing area. Even though I hated the process--I still think it is a cute chair and I think I will like it a lot more as time heals my spray painted wounds!!

Tuesday, March 30, 2010

Big Boy Tie

My little baby turned 10 this week. Boy how time flies! So I have been making all my little guys these really fun Little Guy Ties lately. But they are the ones with the little strap that velcros behind their necks.
And I was thinking that a 10 year old might want to start wearing Big Boy Ties. SO for his birthday I made him his first real manly tie. So here it is.


And here is the man wearing it on his 10th birthday!!

Isn't he SO CUTE? And SO GROWN UP!!! I LOVE this guy!!
Happy Birthday Connor!!


Hubby's Lamp Re-Do

SO--after finishing my first lamp re-do (and loving the results), I have had my eye on this beige beauty on my hubby's side of the bed. It is the only beige thing in our all white bedroom.

I began by tracing out my lamp shade pattern on to some freezer paper (you can use any paper, but the advantage of using freezer paper is that you can iron it right on to your fabric instead of pinning it on--you do take it back off after cutting out your fabric--so don't go out and buy any--but if you have some on hand, it does make handy tracing paper).
I just started at the seam and rolled the shade along the paper--marking both the top and bottom edges until I got to the seam again. Then I connected the edges--this gave me my basic shade shape. I then added about 3/4 of an inch to both sides so I would have enough to roll over the inside edge.
Then I used the pattern I just created and cut it out of my fabric. I used SPRAY ADHESIVE and sprayed the wrong side of my fabric.
Next I started at the seam and matched up my top and bottom to where I wanted it to lay (so that I would have equal amounts on both edges to fold over to make a nice finished edge). I worked my way around the shade, pressing the fabric smooth all the way around. When I got to where I started--I folded over the edge so it looks nice and then I used a little fabric glue and glued it all the way down the seam.
Then I was ready to tackle the ends. I just ran a bead of fabric glue all the way around the edge of the shade and just a touch on the inside edge of the shade. Then I folded the fabric up and over the edge.

I also used a pin to tuck in the fabric right to the edge of the shade. This gives a really finished edge.


I then spray painted the base of the lamp white. And now--NO MORE BEIGE!!

And this is my finished project. I have to admit that it is not my favorite. I just don't care for the lamp in general--but I think this re-purposing makeover saved its life for a couple more years till I decide to replace it. I definitely am glad to see the beige gone!!
And I did it all for free since I already had all the materials on hand! So that's not bad!


Saturday, March 27, 2010

Quiet Penguins

Our ward is putting together several quiet books for one of their Humanitarian Projects. I was in charge of doing these little pages. The pattern was taken from my children's very own quiet book that my dear friend Sherron made for me.
This little page has a Mamma penguin and inside the zipper is a little baby penguin. (The one Sherron made for me actually is the daddy penguin--inside is the mamma and inside her is a little egg with a baby inside the egg. SUPER CUTE--but for our purposes--one inside was plenty.)


Friday, March 26, 2010

Out with the Old

So--I have had the same old frame hanging on one of the walls of my bedroom for 7 years--and the same frame hung on the wall of our old house before that. It is one of those really boring--ho-humm multi picture frames--and not a cute one--kind of old school one. And so with no further adoo... Here it is:


Ugly. I know.

ANYWAYS, I was ready for a change. SO I went to my trusty dollar store and bought some fun frames that I liked the look of--but didn't care for the color--and SPRAY PAINTED them (and then sand papered them to make them look just a little antiqued--AND ALSO this hides the imperfections in my painting job! Nice trick). Yes--I know, I am currently having a love affair with spray paint. Then I took some cute paper and ribbon and VIOLA! Cute wall for only $3!


Thursday, March 25, 2010

Lamp Re-do

SO--I have wanted a new lamp for my bed side table for a while--but didn't want to spend the $$$. SO--I found this little beauty at the Goodwill for $2.99 and thought my old shade would fit it. AND IT DID!!!


So my hunny and I sanded and spray painted it--and I recovered the old shade. I LOVE how it turned out!!! AND IT WAS SO EASY!!!


Now I have my eye on my hubby's lamp--I think it needs a re-do too!

Sunday, March 14, 2010

$1 Cabinet Makeover

SO--We live in a SUPER small house. We're talking 6 of us living in 1200 square feet! Lets just say it is cozy. We have our computer AND my sewing area all in our Small Master Bedroom. Up until now I have had a tiny sewing table right next to our computer desk--and my sewing stuff stashed in any small cubby space I can find. But my awesome hunny wanted me to have a nicer space to sew and suggested we move things around to give me more space, AND he wanted to buy me a cabinet to house all my sewing stuff. So the project begins!


We decided to check out our local RE-Store (Like a Good Will for home improvement stuff) and we came across and awesome find! A small two door cabinet for only $1!!! All of the other cabinets were $20--but for some reason this one was ONLY A BUCK!!! I'm sorry I don't have a before picture of it. It was brown and ugly and the sides of it were un-finished. BUT it had potential.


SO we took it home and my hunny painted it white for me and added cork (from an old cork board that we already had) to both the unfinished edges so that it became a cork board for me to hang patterns and stuff while I am working on them! Here is as close to a before picture as I have:


Then I used my 50% off coupon at Joann's and SPLURGED on this thread holder ($7.50):


Which we then painted white and hung on the wall which is SUPER functional and REALLY pretty too!


Then I found a great blue wicker basket at Joann's that was already 50% off and it was a little damaged so they gave me an additional 10% off and so it only came to around $5.75.


THEN the dollar store came thru for me for the additional side baskets that I put on top of the cabinet. AND while I was at that same awesome dollar store--I happened upon the most awesome baskets for the INSIDE of my cabinet! FOR ONLY A DOLLAR EACH!!! AND they MATCHED EVERYTHING!!! It was meant to be!!


So adding up all the spray paint and EVERYTHING--I spent under $25 for the most AWESOME sewing area ever!!!

And Ta Da.....(drum roll please).... Here it is all together:

Let the sewing BEGIN!


Bye Bye Brass

What a busy weekend we have had!! My little hubby gets a GOLD star (or maybe it should be a white star) for all his hard work this weekend!
I am on a rampage to get rid of all the brass in our house. Our has has brass fixtures EVERYWHERE!! And I have hated them for 7 years!! Then I was inspired by the ladies over at Enchantresses3, who have transformed their homes using SPRAY PAINT. So I figured if they could do it--then SO CAN I!!
So therefore, this weekend my before mentioned AWESOME husband, took down ALL our fixtures (we're talking all the lights, towel bars, TP holders, curtain rods, etc. etc.) and spray painted them!! AND I NO LONGER HAVE BRASS FIXTURES!!! I have the look of all new fixtures for around $8 (the cost of a can of spray primer and paint). I am one happy woman!!

So here are some of the before pictures:
(And really the pictures don't do this makeover justice!)


And I was only able to get a shot of one of the towel bars because my hunny was so on the ball and took them apart faster than I could get the pictures taken--but just know that all the hand towels and TP holders looked just the same as this super attractive towel bar!


And here are the after pictures:


Let me just say again--I am ONE HAPPY WOMAN!!!

And that is not all my hubby did for me...Oh no! That is not all!

Friday, March 12, 2010

Spring Dress


So--I was looking online at all the fun crafts and sewing projects that people have done and found THIS fun idea for a pillowcase dress at one of my favorite places (Little Birdie Secrets). I liked the simpleness of the project and had some fun spring fabric--so I made it up into this cute little spring dress for my Nicole!

I love how it turned out!!

Nicole liked it too!


Related Posts with Thumbnails