
One of my favorite blogs is MADE. This little lady is one of those amazing people that can create something awesome from ANYTHING.
Well, she made this Awsome Beach Towel Dress for herself pictured here:

I fell in love with the idea and decided to make one for my little lady.
Dana, from MADE--gave very general directions on how to make this little number--so I decided I would document exactly how I made this one--so that if anyone else wanted to do it--they could see how I did mine--but really all the credit should still go to her--because she is just plain AWESOME--and I am just a copy cat!
So here is what I did to make this:
(And again--sorry for the picture quality--darn camera phone!)

I bought a cute but cheapy towel from Walmart ($4).
(Because you are going to be shirring this--it does help if it is a CHEAPY towel. The expensive ones are too thick and won't shirr as well. SEE--it PAYS to be cheap sometimes!)
(Because you are going to be shirring this--it does help if it is a CHEAPY towel. The expensive ones are too thick and won't shirr as well. SEE--it PAYS to be cheap sometimes!)

Next you need to figure out your dimensions.
When Shirring, a good rule of thumb is to double the width of the area you would like to be shirred. (So if you are shirring a dress or a shirt--you should double the bust measurement, if you are shirring a skirt waistband--then double the waist or hip measurement--whichever the case may be for your pattern).
My daughter is around a size 5 or 6. Her bust measurement was 22"--so I measured and cut the width of the towel down to 44". (The way I did this left me with only one side seam--if you want it to be equal on both sides than you can cut the piece into two--and sew them back together so that there will be side seams on both sides--but if you don't care then just leave it to one seam--its easier).
Then I measured my gal to see how long I wanted to make it--I wanted it about 22" long. So I cut it at 22 1/2". (I made sure to leave 1/2" extra for serging and turning the hem on the bottom--you don't have to worry about hemming the top because you will just use the hemmed edge already on the towel. When you cut it--keep all the extras as you will use them to make your straps later.)

I then serged all of the raw edges. If you don't have a serger--a zig zag stitch will do fine. You just want to make sure you finish off the edges--as terry cloth is VERY MESSY if you don't.
After serging the edges, I folded under the bottom edge 1/4", pressed it and hemmed it. This is going to give you a nice finished hem on the bottom.

Now you can either sew up that side seam--or leave it and sew it up later. (I usually recommend sewing it up now as I like to shirr things in a circle--its easier to do it in one round seam than to try and match up all the lines of shirring and making sure to catch all the shirring stitches in the side seam later.) Having said that--I didn't do that this time. So this tutorial shows me shirring it flat.
Now its time to SHIRR.
This is the fun part!
So you need to get out your stretchy elastic thread. I bought mine at Walmart for somewhere in the $1.75 range.
It looks like this:

Now you are going to take it and HAND WIND it on your bobbin.

You want to wind it loosely so that it isn't stretched. Just keep winding that thing till it looks full.

Then you just load it into your sewing machine just like usual.

Now the shirring begins:
Set your machine to the LONGEST stitch length that you can.
Just place the fabric under your presser foot (leaving a long tail so you don't loose your threads when you start sewing).
Sew about three forward stitches and then back stitch about three and then continue sewing the length of the fabric.
Sew about three forward stitches and then back stitch about three and then continue sewing the length of the fabric.
(You first row of shirring usually doesn't look like much and you will be wondering if you are doing this right...but YOU ARE...so keep going!)
Once you get to the end of your fabric--BACK STITCH again.
Now you can start on your next line.
Another reason I like to shirr when the side seams are sewn is that you don't have to cut your threads and pull the fabric out to get to the new line of stitching--you just leave everything in and pick up your presser foot and move it over the desired width, back stitch and continue to sew.
I usually like the shirring to be the width of my presser foot apart. It is an easy guide to follow and seams a really foot width.
So just keep on sewing these lines of stitching.

And keep on sewing some more:

I did 12 lines for my little gals dress.
The more lines of shirring you do--the tighter it will pull together.
If it isn't as tight as you want it--you can take it to your ironing board and spray a little water on it and PRESS it with lots of steam. The shirring will shrink up together nicely. Its quite neat to see actually!
If it isn't as tight as you want it--you can take it to your ironing board and spray a little water on it and PRESS it with lots of steam. The shirring will shrink up together nicely. Its quite neat to see actually!

Now that your shirring is finished it is time to sew the side seam (if you haven't already).

Put right sides together and and sew the side seam up.
MAKE SURE to take out you elastic thread!! Or you will get to pick it out and do it again! (Don't ask me how I know this!)


Now on to the straps.
I cut two pieces of fabric 3 1/2" wide and 10" long.
I folded and pressed the edges in 1/4 of an inch.
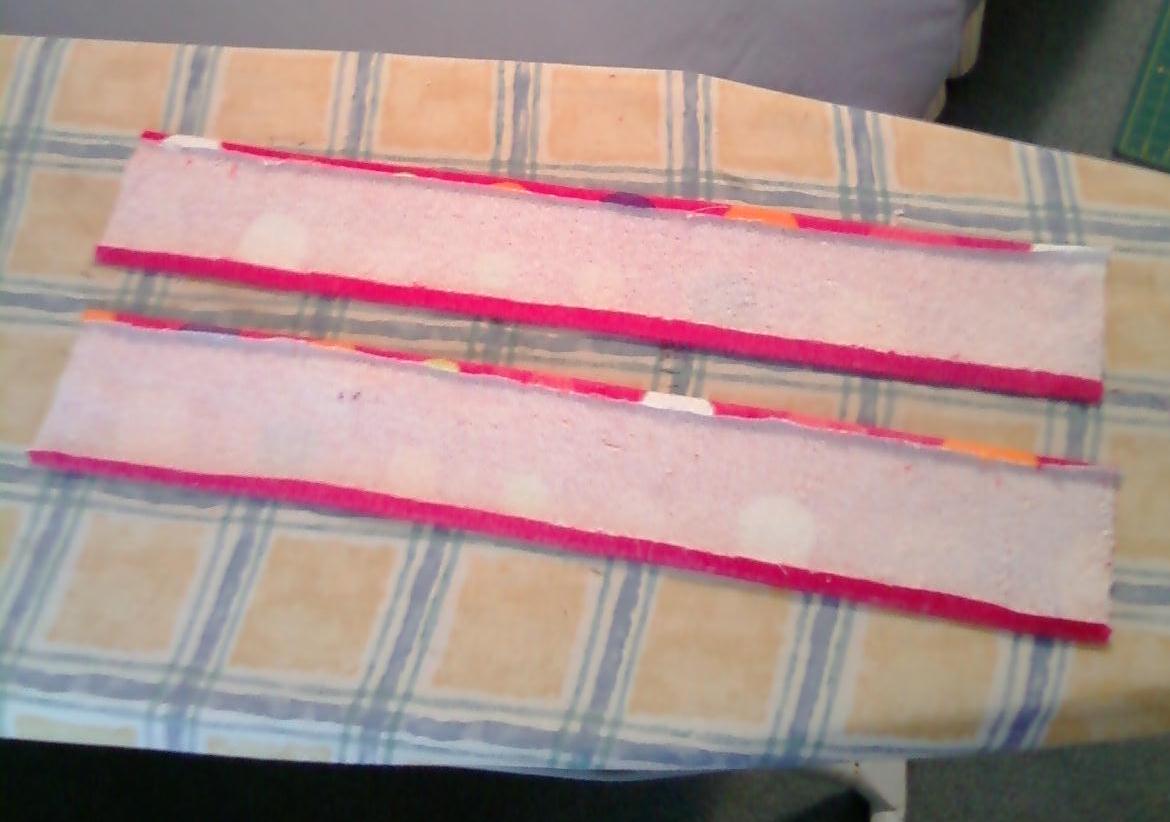
And then folded them in half length wise and pressed them.
Then I top stitched them on both sides making sure to catch all the edges in for a clean edge finish.


Then I serged the end edges and pinned them in place on the inside of the dress. I made sure to overlap the first two rows of shirring so that I could sew right on those lines to hide the stitching.
And that is it! Its finished!
The Perfect Summer Cover Up!


Thank you Dana for the great idea!
Now--Go and make You AND your Girls one of these for the summer!


ok...I really like this one!!!! just might have to try this for my girlies!
ReplyDeleteOh I love this and I want one for ME since I think my boys would look a little silly. I love it!
ReplyDelete(And I want to know how you do all that with your feet?! HA!) :)mi
how in the world did i not know this blog existed. its so AWESOME!
ReplyDeleteI just found you so this dumb question is a few months late. Did you use the elastic thread for the needle as well?
ReplyDeleteI have tried and tried. But i cannot get the shirring down. I have done everything to the 'T'. :O(
ReplyDeletehi, i love this idea... I start sew make 2 or 3 weeks... i am thinking making this dress... i hope I can do it!!
ReplyDeletethanks for share!!
TB
http://madebyheartbytb.blogspot.com/
I am a little new to sewing (1 year) and want to make a swim cover-up. I love this idea. Do you think this would work with Lycra?
ReplyDeleteVanessa
I bought the same towel (and a few other colors of it too) a few years ago....and i can tell you exactly what ill be doing with at least one of them! What a fantastic idea. I doubt I will even care about replacing one of our pool towels...$4 is a lot cheaper than buying my daughter a cover up this year. AND she will be excited to help :)
ReplyDeleteHello mates, pleasant paragraph and good arguments commented at
ReplyDeletethis place, I am actually enjoying by these.
Here is my page online casino games fjdaajf http://bestonlinecasinoworld.tumblr.com/
Hey There. I discovered your weblog the usage of msn.
ReplyDeleteThat is a really well written article. I'll be sure to bookmark it and come back to read more of your helpful info. Thanks for the post. I will certainly comeback.
My webpage :: money slots online
Your means of describing everything in this post is in fact nice, all be capable
ReplyDeleteof simply know it, Thanks a lot.
my web site :: Casinos Online Slots
Hiya! I know this is kinda off topic however I'd figured I'd ask.
ReplyDeleteWould you be interested in trading links or maybe guest writing a blog article
or vice-versa? My site discusses a lot of the same topics
as yours and I think we could greatly benefit from each other.
If you happen to be interested feel free to send me an e-mail.
I look forward to hearing from you! Great blog by
the way!
My blog ; Play Slots For Money
I don't even know how I ended up here, but I thought this post was great. I do not know who you are but certainly you are going to a famous blogger if you are not already ;) Cheers!
ReplyDeleteFeel free to visit my website ... slots online real money
It's in fact very complex in this busy life to listen news on TV, so I only use world wide web for that reason, and obtain the latest news.
ReplyDeleteMy homepage : slots with no deposit bonus
Hey there! I know this is kinda off topic however , I'd figured I'd ask.
ReplyDeleteWould you be interested in trading links or maybe guest writing a blog
article or vice-versa? My website discusses a lot of the same subjects as
yours and I believe we could greatly benefit from each other.
If you're interested feel free to shoot me an email. I look forward to hearing from you! Wonderful blog by the way!
my page > real slots online
I was wondering if you ever thought of changing the
ReplyDeletepage layout of your website? Its very well written; I love what youve got to say.
But maybe you could a little more in the way of content so people could
connect with it better. Youve got an awful lot of text for only having
1 or two pictures. Maybe you could space it out better?
Here is my weblog ... real money casino games
This is a great inspiring article.I am pretty much pleased with your good work.You put really very helpful information. Keep it up. Keep blogging. Looking to reading your next post.
ReplyDeletereal money casino
You must be like the tens and thousands of individuals who go nuts over slots online. In fact, one of the prime reasons why people go for slots premium gambling domains
ReplyDelete