
I am SO EXCITED about how this project turned out!!!
And because I am SO EXCITED--I took about a Bazillion pictures --so be prepared!
Ok--let me start at the beginning. I stumbled upon THIS awesome blog (Sawdust and Embryos) a while ago--and have been CRUSHING on all of the AMAZING PAINTED BACKSPASH'S that this gal and her man do up! And since she lives too far away to do mine--I decided I would just have to do it myself.
And then I remembered that my AWESOME FRIEND Jaime (from I'm a Mom not a Professional)--did the same thing HERE in her house several years ago. So I called her up and asked her to help me with my kitchen. And she said YES!! Isn't she the best?
So here we go:
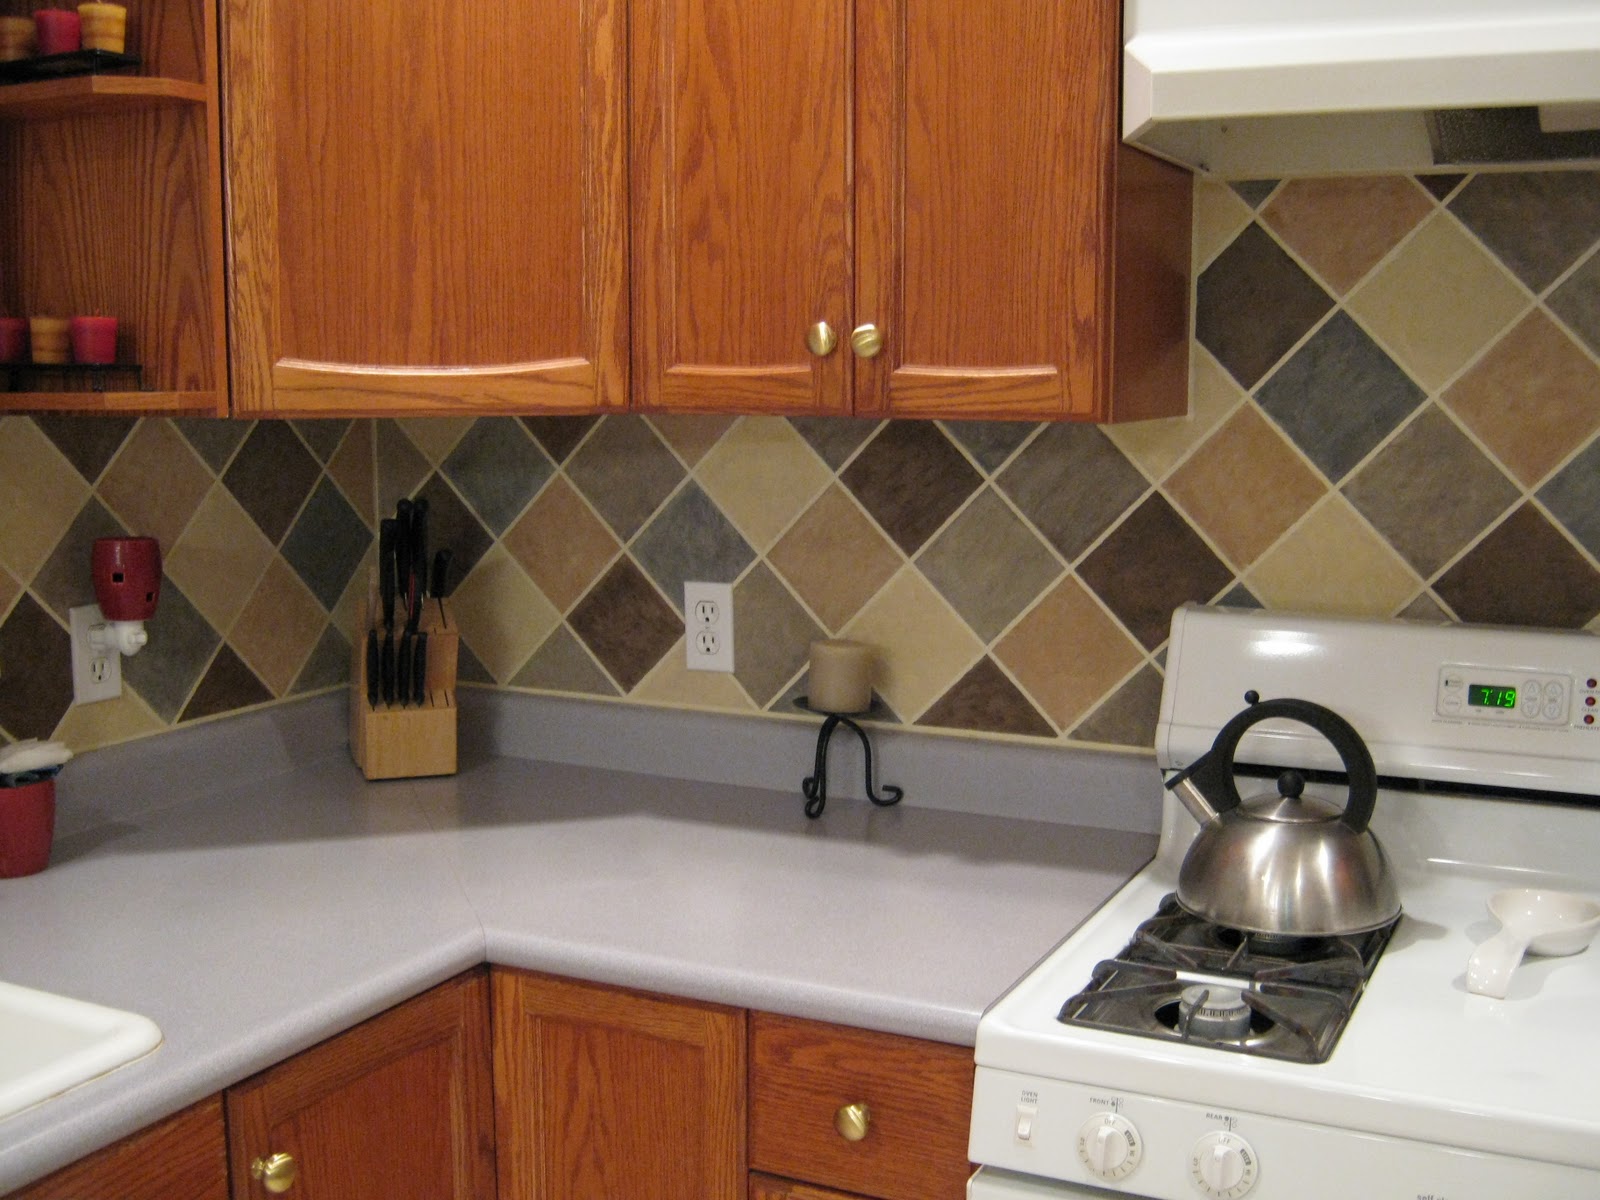
Here are a few pictures of my kitchen in all its BEFORE glory. For 8 years I have lived with the Orangey cabinets and grey/blue counters (and I'm not even going to mention the retched white and blue flowered vinyl flooring!) and wondered WHY someone would choose this color scheme?


So to do this project I started gathering my needed supplies.
I stocked up on a bunch of sponge brushes and fine brushes for the detail work. (I spent about $5 on sponge brushes--I found I needed quite a few of them for mixing colors and such).

I couldn't find any 1/4 inch Painters tape (for the grout lines) anywhere--so I went to Joann's and got 1/4 inch quilters tape. (The Big roll--which I used ALL of--was $5.99)

The quilters tape worked great--the only downside for me was that it was EXACTLY the same color as my existing wall--so it was harder to apply and to see what I was doing! It was Camouflage!
Then for the paint. I decided on five colors to mix and match to create my tile looking back splash. I tried to get a color that was close to the cabinets and one that was close to the counter top--and then some others that I thought contrasted nicely with those. AND A LITTLE FYI--I spent probably around $10-13 on the paint (two bottles of each color).
These are what I decided on:

Then Jaime and I started choosing our color combinations for our tiles. We used several colors on each tile to add dimension.
These are the combinations we came up with:


Next came the WORST part. Figuring out the lines and doing the taping.
I unfortunately did this part all by my little lonesome. And consequently it took me FOREVER (and a lot of pencil marks were erased and redrawn and a lot of tape was wasted) and by the end my brain was tied in a knot. But I DID IT!!!!
See how the tape lines are invisible? Accept for the ones that I started to paint over--but then decided against it.

And then came the fun part. PAINTING.
Jaime made me promise not to put any pictures of her in this post--I don't think this counts do you?

She did take a few of me though.


And I took a few of what 7 kids did while we were painting:


Anyhoo--Back to the painting.
It doesn't look like much while you are doing it. You have to keep telling yourself it will look awesome when the tape comes off.

See--it looks SO MUCH BETTER with the tape off. Now I just need to do some touch up painting in the grout lines.

Making my way all around the kitchen. ALMOST DONE!!!

It was funny to live with my stove in the middle of the kitchen for a couple days while I finished this project.

And FINALLY--all the hard work (HOURS of measuring and taping--and pulling it all off to measure and tape all over again, TWO COATS of paint on every square, TOUCH UP PAINT over EVERY GROUT LINE, and then some miscellaneous REPAINTING OF SOME OF THE SQUARES that I wanted a different color--do you know how hard it is to do "RANDOM" evenly?) has finally paid off.
IT IS DONE!!!
AND it only cost me around $25!!
And I couldn't be happier! FINALLY the cabinets don't scream ORANGE. I know longer hate the counters. They all just go together in one cohesive color scheme. (Minus the white and blue flower linoleum--but we still aren't talking about that right now). (Oh--And Minus the Black and White curtains that I will now have to change.)


And just because I am a sucker for BEFORE & AFTER shots.
BEFORE:

AFTER:

Now life makes sense.
At least in my kitchen.

Linking to THESE parties.


Get outta town! It's awesome.
ReplyDeleteI applaud you for your patience in getting it just perfect. Way to go!
looks great! you might consider painting your knobs too. i have those fabulous cupboards too and changing the knobs helped a ton.
ReplyDeletethis is amazingly beautiful. amazing job!
ReplyDeleteI just clicked over from JAG and this is amazing!!! I love it!!!! And the nice thing is if you ever get sick of it you can just paint over it instead of dealing with removing tiles.
ReplyDeleteOnce again, I am amazed and proud of your abilities! Wherever did you get them? This project is awesome, beautiful, and perfectly (!!) done (as usual). Way to go girl!!
ReplyDeletew! Such dedication and patience!! It came out great!
ReplyDeleteWhat an inexpensive transformation! Way to go!
ReplyDeleteWOW that is amazing work!!!!!!!!! It looks so GREAT!!!!
ReplyDeleteI've seen it in person and it looks really good.
ReplyDeleteIt looks great! You did a wonderful job.
ReplyDeleteAWESOME!!!Can't wait to see it in real life.
ReplyDeletep.s. that totally counts I don't know if I can be your friend anymore :)
ReplyDeleteOh my goodness girl I love it!! That so does look like real tile!! You can come do mine next :D
ReplyDeleteIncredible transformation! Love it!!
ReplyDeleteI just came over from Michelle's blog and I am so glad that I did. I believe this may be the answer to my shelving unit problem. I'm going to get started as soon as the munchkins are in bed.
ReplyDeleteGreat job! It looks like tile in the pictures. Love how it turned out!
ReplyDeleteIt looks awesome! I am inspired to do my own now!!! You always make things look so easy....and thrifty! Love it!
ReplyDeleteThat is an out-of-this-world fantastic idea. You should be so proud! It looks great!
ReplyDeleteBest regards,
Gloria
Just stopping by from Met Monday. I am so impressed! I don't think I would have the patience to do that! It looks wonderful! I am thinking of just putting up paintable wallpaper in the tin tile print and painting it!!! Awesome job!
ReplyDeleteOh, my goodness! This looks fantastic! You painted it? I know you did, I saw the snaps! :)
ReplyDeleteBut I'm just amazed at how wonderful it looks! It does look just like tiles. I know you're so proud of it.
Be a sweetie,
Shelia ;)
That is brilliant! Way to go having the patience of Job!!!! Nice girlfriend, you both did a fantastic job...especially with 7 kids around :)
ReplyDeleteBeautiful job!
ReplyDeleteGreat job! I have similar cabinets...hated them, until I changed the wall color and the cabinet knobs...I painted my brass knobs with Rustoleum's Hammered Bronze...it has proved to be VERY durable and they look GREAT now! I also spray painted my brass chandelier with it...love it!!! What patience you mush have! A job well done!
ReplyDeleteBeka
This looks AMAZING, thanks for the inspiration!
ReplyDeleteWe did this same thing a few years back except we did it on our floor. We didn't have a huge space and when we were done we sealed it 4- 5 times with a clear coat varnish.
ReplyDeleteEveryone commented, then crawled down just to make sure. I am sure you are getting the same reaction.
Yours looks awesome, I LOVE the colors you chose!
Wow Sharon! So clever and creative and love that budget! It looks amazing. I'd swear it was slate! Great job! Thanks so much for sharing in the DIY Project Parade!
ReplyDeleteRoeshel
You rock soooo hard! I've been looking 4 a cheap way to redo my backsplash, now I got it.
ReplyDeleteWhat a great look, and so cheap, I love it. I need a backsplash, you have inspired me. Thanks!
ReplyDeletelooks UH MAZE ING!!
ReplyDelete-dani
WOW... I LOVE it!!! It looks so great, I never would have guessed that its just paint!
ReplyDelete- Michelle @ Bunch of Craft
Oh my goodness, that's amazing!! What a fantastic and thrifty idea!!
ReplyDeleteI love it! It looks fantastic, what a great transformation!!!
ReplyDeleteAMAZING AND WONDERFUL!!! Ahhh the beauty of paint. I painted a stone patio for a friend of mine years ago in a similar fashion. Looked great!
ReplyDeleteI am ASTOUNDED with this! Absolutely amazing! I may have to try it... Did you have to seal it with anything so it's able to be wiped down if needed? It really is beautiful. I don't know if I'd be that good at picking out colors... wanna come to San Antonio and help me out? ;0)
ReplyDelete~robin
AWESOME! That looks so cool! I'm inspired to do something now...hmmmm....which room should I start with, the laundry, kitchen, or our HUMONGOUS master bath.
ReplyDeleteOH...forgot to mention...tape. If you ever can't find thin quarter inch tape, look up "auto paint supplier" in your town. They have TONS of tape in a zillion sizes. And usually, the small tape is CHEAP...talking LESS than $2 a roll...;)
AMAZING transformation! i cant believe you had the patience to do it, but it totally paid off!
ReplyDeleteThis is freakin' amazing!!! I kept scrolling back and forth because it looks so much like tile in the finished pics. WOW!!! Great job, you have my admiration you are obviously a very patient gal!
ReplyDeletelifeofperks.blogspot.com
You were my inspiration for this!! http://www.facebook.com/photo.php?pid=15693359&l=54723d160c&id=866710110 I used a $4 tester for the field color and Rustoleum Hammered finish $11 in brown for the insets. Menards even carried 1/4" tape, just on the opposite side of the aisle from the other tapes.
ReplyDeleteTHANK YOU!
That looks freaking awesome!!
ReplyDeleteThis turned out AMAZING! I am so in love with this back splash! Crazy thing? I actually tiled my back splash this week too! But I DID use tile. I never considered paint. It looks AMAZING! I am featuring this tonight!
ReplyDeleteHi Sharon. I just stopped by from Met Monday. What a great job you did. It looks wonderful. I'm a new follower now. Thanks for sharing your cool project.
ReplyDeleteHugs...Tracy :)
I'm featuring this at Life As Lori. If you would like stop by and grab my I was featured please do so.
ReplyDeleteI can't believe that beautiful backsplash is painted on! You did an AMAZING job! Geez, you have a lot of patience!
ReplyDeleteIf you get a chance, I'd love for you to link to this on my blog hop :)
T-O-T-A-L-L-Y A-M-A-Z-I-N-G!!!!!! I crown you queen!!! In the past, I decoupaged hand printed "tiles" to my back splash. Again, lots of work! But, thrifty!
ReplyDeleteThat looks really awesome. I almost did the same thing until I got some tile for practically free, but then I had to learn how to tile.
ReplyDeleteAmazingly awesome!! I know want to do this at our house!!! I think my husband even agrees, which, is a miracle in itself! That's how good you did!
ReplyDeleteI'm worried about getting the colors right though, I'm just not good at those kinds of things..
GREAT JOB! :)
Carrie / krafty119@hotmail.com
That looks awesome...and way cheaper then tile. I might give it a try in my new kitchen or maybe the guest bathroom first.
ReplyDeleteWOW! Looks wonderful!
ReplyDeleteI can't believe how warm and inviting it made your kitchen look with just that little change. Great job!
ReplyDeleteTraditional back splashes have been my favourite of all times. But the way all these installations have been done, i really appreciate it.
ReplyDeleteThis comment has been removed by the author.
ReplyDeleteThanks for this fantastic idea! I found your idea on Pinterest, then went on over to the Sawdust and Embryos blog. After seeing all the pics, I thought, 'I can do this!' So I made a trip to Michael's and our local hardware store, loaded up on paint and yes, I was able to find 1/4" green painters tape, and went to work! After hours of taping, then painting, it's finally finished! Despite the pinched nerves in my back, I'm in love! I'm going to apply a coat or two of acrylic polyurethane to seal it for easy cleaning purposes and a longer lasting finish. Thanks again for inspiring me! :)
ReplyDeleteOh my goodness! How amazing!
ReplyDeleteWow!
ReplyDeleteOMGOSH! I love this, its beautiful and fun. I am going to have to try this for sure...:)
ReplyDeleteLove it! I have the same counter top and flooring in my kitchen! I also have an awful blue/gray tile backsplash to go with it. I am looking to paint the tiles. I really like this color scheme.
ReplyDeleteYou gave me so much inspiration!
ReplyDeletecould you please let me (us) know what you did for a clear coat over the paint??? i would love to do this, but am worried about spaghetti sauce, etc splashing onto the painted surface & when i scrub it off...the paint coming off... let me know, please and thanks a bunch!!!
ReplyDeleteThanks for the great question. I actually didn't do a coat over top--though I probably should have. The amazing girl over at Sawdust and Embryos (whom I got the idea from in the first place) discusses her whole process and top coat here: http://www.sebacksplash.com/p/how-it-works.html
ReplyDeleteI did not see any part that talked about a top coat when I did mine. But the acrylic paint is holding up well.
I love that! How cool are you?! Great job! I love how it came out!
ReplyDeleteI absolutley LOVE the colors in your backsplash it looks so nice!!! You did an AWESOME job:)
ReplyDeleteBRAVOO!!!! Great job...
ReplyDeleteI would have never known this was paint! Love it! What a great idea!!! Fab job!
ReplyDeleteWOW impressive!!! What a great idea, love it and thank you for the idea!
ReplyDelete:) Beautiful. And you magially got more papertowels:)
ReplyDeleteAbsolutely beautiful! Do you have to use acrylic paint or can you use ordinary wall paint?
ReplyDeleteJust when I think I can't love what you do any more, ou knock it right out of the park. Love this!
ReplyDeleteall i can say is WOW! and going to have to try this myself
ReplyDeleteThis is great and all your pics are so helpful!!! Awesome. I want to try it.
ReplyDeleteDid you dip the brushes into all 3 colors at once and go from there, or did you mix the colors first?
ReplyDeleteMost tile suppliers will send you samples of your chosen tiles, so you can see how they look in the intended setting before you buy. Check how the tiles look in both natural and artificial light before making a final decision.
ReplyDeletei'm wondering if the acrylic paint is okay with all the moisture from cooking??
ReplyDeleteI ABSOLUTELY CANNOT BELIEVE THIS! So amazing!!!
ReplyDeleteThis is so absolutely beautiful. You have given me so much inspiration for my kitchen. I would like to link here from my new blog. I'm about to start a DIY expedition on my home and I am so grateful that talented folks like you are willing to share your experiences.
ReplyDeletehttp://accordingtostats.blogspot.com/
Just wanted to swing over and say hey! The backsplash looks great. It's amazing how it can transform a kitchen isn't it.
ReplyDeleteWhat about putting a clear coat over it? Wouldn't that make is so you could wipe spladers off?
ReplyDeleteHow totally awesome!!!! So do you still have this up??? Did it wear good??? I absolutely wish you were my neighbor and could help me do this!!!!!
ReplyDeleteThanks for great information you write it very clean. I am very lucky to get this tips from you cool blog piece on the marble quarries.
ReplyDeleteslate tile flooring
I love your backsplash and that you soooooo much for all the details! I haven't been able to find the tape so your quilting tape idea was perfect! Thanks again! :) Jilleena
ReplyDeleteGreat job. You have made me want to try it. Did you seal the paint with anything? My oven is separate and so my stove too us liw in back and things can get real sticky behind it .
ReplyDeleteAgain awesome job!
Hi, you can paint your vinyl floor too! Mine was the ghastly 70's orange. 1. Clean well with TSP. 2. Lightly sand. 3. Use a high-adhesive primer. 4. Choose your colors in Floor Paint for durability--although any high gloss works. 5. Tape off your pattern and paint. I chose a large stencil in shades of brown, black, cream and white. 6. Coat with Polyurethane--the water based dries quickly. There is a slight yellowing so choose your colors to consider it. I've enjoyed my floor for 15 years with occasional touch ups and another coat of poly. Everyone loves the stenciled rug pattern. It is the easiest floor to keep clean--just a daily sweep and weekly mop.
ReplyDeleteHi,
ReplyDeleteThis looks great! I am just wondering if the paint will work on my laminated vinyl backsplash too?
Thanks
Hi,
ReplyDeleteThis looks great! I am just wondering if the paint will work on my laminated vinyl backsplash too?
Thanks
I've seen it in person and it looks really good. Kitchen Backsplash Ideas
ReplyDeleteJust came upon your site here and I have to tell you that I am beyond impressed!!! What an amazing job you did! Very clever and it looks fantastic!
ReplyDeleteWe’ve been stumbling around the internet and found your blog along the way.
ReplyDeleteWe love your work! What a great corner of the internet :)
here
Very well done! Inexpensive yet fabulous! It really adds more style for little cost (money that is...I'm sure the time cost was far greater).
ReplyDeleteAn upgrade to your kitchen backsplash is one of the simplest and cheapest ways to freshen up your kitchen.
ReplyDeleteThis is a really cool post. I love this kitchen. It is completely the style that would fit me.microwave keeps blowing fuse
ReplyDeleteI love how you turned a tiring kitchen into something you’re genuinely excited about. The part about doing “random” evenly made me laugh because it’s so relatable. Honestly, seeing your DIY process almost makes me want to skip hiring tile installation in long island and try it myself.
ReplyDelete