Tuesday, June 1, 2010

Baby Boy Shower Gift

(Again--hang in there with me as all the pictures still come from my not so awesome camera phone)

I just made these little babies for a new little Baby named Austin.

I think the pair turned out super cute.

I have made many of these ties and still never get over how DARN CUTE they are.
Again--you may buy the pattern from my favorite blogger (makeitandloveit) HERE. The tutorial is WELL worth the $6.50 she charges!

And this is only the second pair I have made of these little shoes. I am loving them!
I got the free pattern for these little guys HERE.

They are quick and easy and well worth the time--and how cute to match with the tie!!!

My only regret is not finding and making these a lot earlier so I could make them for my own little people!!
Do you think 10 is too old for a pair?

How Jeans become a Skirt

Well--I still don't have my camera back--but at least I have FINALLY figured out how to get my pictures OFF my phone! (Yippee!!!) They are DEFINATELY lower quaility pictures--but they are the best that I can do right now--so they will have to do!
Now I only have a thousand things that I want to post!! So I have some catching up to do!!


So here is a fun project that I just did for my little gal. She is a skirt wearer. She really does NOT like to wear pants. So when I saw THIS little tutorial I figured it would be a perfect project for my girl! Then we both could be happy--she would be wearing JEANS (which I love) and she can wear her beloved skirt!


I was worried that doing the skirt like it was done in the tutorial from Skip to my Lou would make the skirt be too short. So I changed it up and made it MY WAY. And here is what I did.


I started with 2 pairs of jeans--with only 3 usable legs.


I chopped off the legs right where all the seams meet.

(Be MORE careful than I was--and cut evenly across--see how the back side is longer than the front? Oops! Try and cut them as evenly across as you can)


Then I cut the legs open down a seam. I cut very close to the edge of the seam because I am going to turn the leg sideways and use that edge as the hem of the skirt. (I put a little dab of Fray Check on my finger and ran it along the edge to stop any fraying). This is a cute way to have a "finished edge" without having to do any hemming!


Also--cut off the bottom hem of the jeans (which will become a side seam) as you will be sewing it to another piece and you don't want it to be big and bulky! (I just didn't get a picture of it with the hem cut off)


Then I did the same to the other usable leg. I will use the other pieces of these jeans for another project later!


Then I cut this light colored leg into two equal pieces so that I could insert them as the skirt side pieces. Then I trimmed up any odd angles on all of the leg pieces and made them as close to the same length (meaning length of the skirt so that when they are sewn together they will all hang down the same amount).

NOTE on my pieces: (the darker pieces of jeans will be WIDER as one leg each are going to be the front and back pieces--the lighter jeans were cut in half to be the side pieces)


Next you sew and edge finish (with either a serged or zig zag finish) all the pieces together placing right sides of jeans together--and matching the bottom finished edges together (Remember--this will be your finished edge).


This will make a big pieced jean tube that will look like this:


Next you want to run two basting lines all along the top edge of the skirt. It is easiest if you start at the back and sew a basting stitch till you get to the front--leave a long tail and then start another one at the front and end at the back. This way you are only having to distribute the gathers on one half of the skirt (and since you are working with a very heavy fabric--this will make it much easier!) Then do it again with a second line of basting stitches just offset from your first line.


Then you pull the bobbin threads and start to gather in all the fabric. Once you have your gathers--you can pin the center of your front and back pieces to the front and center of your jeans--as well as match the side seams to the center of your light colored jean skirt pieces. Then continue to distribute your gathers equally. Pin it all in place and it will look like this:


Then you sew all around it on top of your basting stiches--this way when you turn it you won't see the basting stitches.


Don't forget to edge finish this. Jeans will FRAY horribly! you want to make sure to EDGE FINISH!

When you are finished it will look like this inside out.

(Sorry about the bad picture--cell phone camera!!)


Turn it right side out and Ta-Da!


Cute little skirt for a cute little girl!


Wednesday, May 26, 2010

Dumb and Dumber

So--I just have to write this little post to explain why I haven't posted anything lately!

First--I went for a wonderful little getaway to my sister's--and had a WONDERFUL time! (I love that gal more than life itself!--You can meet her HERE at her blog).

Well--on the way to the airport I put my camera under the seat of her car while we went in to a store. And the brainiac that I am--forgot the darned thing when she dropped me off at the airport!

So now I have NO CAMERA!!

And what is worse--that I had lots of pictures on it that I was going to post and hadn't transferred to my computer yet!

BUMMER!

Well, when I got home--I had a lot of projects that I wanted to do--and didn't want to wait for my sis to send me my camera--so my GENIUS husband suggests that I just use the camera on my phone!!! (That man is a genius I tell you!)

Awesome!

So I have been doing all my projects and documenting them all with my camera phone!

Then this morning I sat down to load them onto my computer and start posting about all of the awesome projects I have been doing...only to discover--I HAD LEFT MY CELL PHONE CORD IN MY CAMERA BAG!!!!

So now I can't even up load the pictures that I have on my phone!!

FRUSTRATION!!

So note to my little sis: Hurry and send me my camera please!!

Wednesday, May 19, 2010

Mirror Fiasco

Ok. Its time for me to come clean.
Not too long ago I did THIS little post about cutting mirrors to the size you want--Easy Schmeasy. But the truth is that AFTER I posted about it--I had some catastrophic problems! And now enough time has passed...my wounds have healed enough for me to be able to write about it.
So here is the whole story:
I was on the look out for something to hang above my bed. I figured a mirror would be perfect. SO I found one such mirror at the thrift store for $5.99. This is what it looked like. (just imagine the mirror inside the frame--I had already taken it out when I realized I needed a picture).

What a Beauty! Right? Well--it had potential. It was a good size and I liked the clean lines of the frame.

Here is a close up of this lovely little frame BEFORE I went to work on it. So inspirational isn't it?

So after I got the mirror home--I realized that it was not just dirty--but scratched as well. BUMMER!

So instead of scrapping the whole idea--I decided to buy an inexpensive piece of mirror ($2.50--which should have cost me $5 but I got a deal that I will tell you about later--I know does this story ever end?)

The mirror was the perfect height--but too long. SO this is where I decided to cut it myself. And I did! And it WAS easy! Remember this picture?

Do you also remember the two pieces of advice I gave when cutting the mirror?

First: the part where you must score the mirror EXACTLY on the line? The cutting tool has a little edge on it (about 1/8th of an inch) and if you place your ruler on the line and run your tool along the edge you may be OVER about an 8th of an inch!!!)

And if you make 2 cuts--one on each side of the mirror to capitalize on the best parts of the used mirror, you may find that you have an extra 8th of an inch on BOTH SIDES of your mirror.

Which in turn amounts to 1/4 of an inch and makes it TOO BIG and then it will not fit into the frame that you took DAYS sanding and painting!!!!!!

And then you might have to go against the other cardinal rule of mirror cutting and try and cut LESS than an inch off so that it will fit into the blessed frame.

Then when you do--the mirror might not cut exactly where you scored it--and it might break the WHOLE MIRROR (and then you might be so mad that you forget to take a picture of the thing to document it). And then you might be left with an awesome frame and NO MIRROR!!!!

But you then may insist that your husband hang the blessed frame above your bed anyways because you worked so hard--and darn it--you are going to have SOMETHING to show for it!!

And then it might look like this for a few days or weeks till you can get up the nerve to try to do it all over again:


Like I said before: Mirror cutting IS easy schmeasy...just measure carefully!

P.S. What do you think about the sconses on either side? I'm trying to decide if I should paint them a silver or brushed nickel or just leave them.

Anyone?

Saturday, May 8, 2010

Back Door Bliss

As promised in THIS other post when I did the trim of my FRONT DOOR--I am writing this post to show you the before and afters of my BACK DOOR spray painting trim project.

I just finished it and am SO HAPPY with the results!

I just wish I had done this YEARS earlier!

Here is the trim in its sun damaged YELLOWNESS before:

The hardest part of this project is the prep--taping and papering.
(And since that isn't hard at all--that tells you how EASY this project is!)

OK--are you ready?
This change is pretty dramatic and AWESOME!

BEFORE:
(And yes, that is my little one on my lap in the reflection--this is how a lot of my projects are done--with my little ones right at my side! They are such big helpers...right?)

AFTER:


BEFORE/AFTER


Now let me just say it again....I LOVE SPRAY PAINT!!!


Linking up to:

DIY Day @ ASPTL


Visit thecsiproject.com

Friday, May 7, 2010

Bathroom Fixture Fix

SPRAY PAINT SAVES THE DAY AGAIN!!!


And I am not even going to be ashamed that I am posting ONE MORE POST about SPRAY PAINT!!

So here is the fixture in our master bathroom:


BEEEUtiful? Not really.


I don't know which was worse--the gold/brass or the lovely petal glass shades over the lights.


The whole thing just screamed UGLY at me every time I looked at it.


That is until I found these little beauties at my friends dollar thrift store
(all three for $1--and that is a deal people!):


So then I used the spray paint left over from THIS little project redoing all the hinges in my house!

And so the fun begins...


And that is how I turned my bathroom fixture that looked like this:


Into THIS:


AND FOR ONLY $1!
That is what is called a GOOD DEAL!

Thursday, May 6, 2010

Spray Painted Door Trim

OK--don't roll your eyes, but I have yet another post about the wonders of spray paint!

My front and back doors have been bothering me. They have this wonderful plastic trim around the window that over the years the sun has turned an awesome shade of YELLOW!

Exhibit A:

(I do not have an awesome camera to do this picture justice--just know that it is pretty yellow!)


So I turn to my new trusty friend: Spray paint.

I chose one that is specifically designed to use on PLASTICS.


AND I saw one of these tools on someones blogs once--and finally found one at WALMART--for somewhere in the $2-$3 range.


I figured it was a good investment in the health of my spray painting finger considering all the spray painting I am doing. And let me just say--IT WORKS AWESOME!!

If you spray paint at all--you really should get one!

It looks like this once you slip it over the can of your spray paint.

So then I taped off the areas of my door that I didn't want to get painted.

And then I went to work!

I applied 2 coats of paint. And I think it looks AMAZING! It looks like I have a brand new door!!

Here are the results:

Before / After

I can't wait to do the same thing to my back door! It is MUCH YELLOWER (is that a word?) and will make an even better before and after picture!

SPRAY PAINT MAKES ME HAPPY!

Tuesday, May 4, 2010

Dresser Found Dead on Roadside

A couple of years ago, we found this dresser on the side of the road with a "FREE" sign on it.
At the time we had just had our 4th baby, and were actually in the market for another dresser--and nothing beats FREE!
So we piled it up into our van and brought it home to our garage where it has sat for the last 2 Years!!!
Until 2 weeks ago--when I sweetly asked my hubby to do the necessary repairs on it so I could finally paint it and GET IT OUT OF OUR GARAGE!!!
Which he did. And we soon realized why it was dead on the side of the road!
It needed a bunch of work done.
So here is a picture of it all taken apart as my sweet hubby repaired it.

Once he was finished I got to work with the priming and painting.
This dresser took 2 coats of primer and like a million coats of paint!! (I think a million actually equated to 4-5 coats--I lost track)
It just soaked up the stuff like it had been in a draught!
Here it is in our garage getting all painted:


The dresser didn't come with any hardware. And because it was a FREE kids dresser--I didn't want to spend much $$ on this little project. So I bought the cheapest little wooden knobs that I could find and painted them to match the dresser.

I stuck them in the bottom of a plate to make them easier to paint.


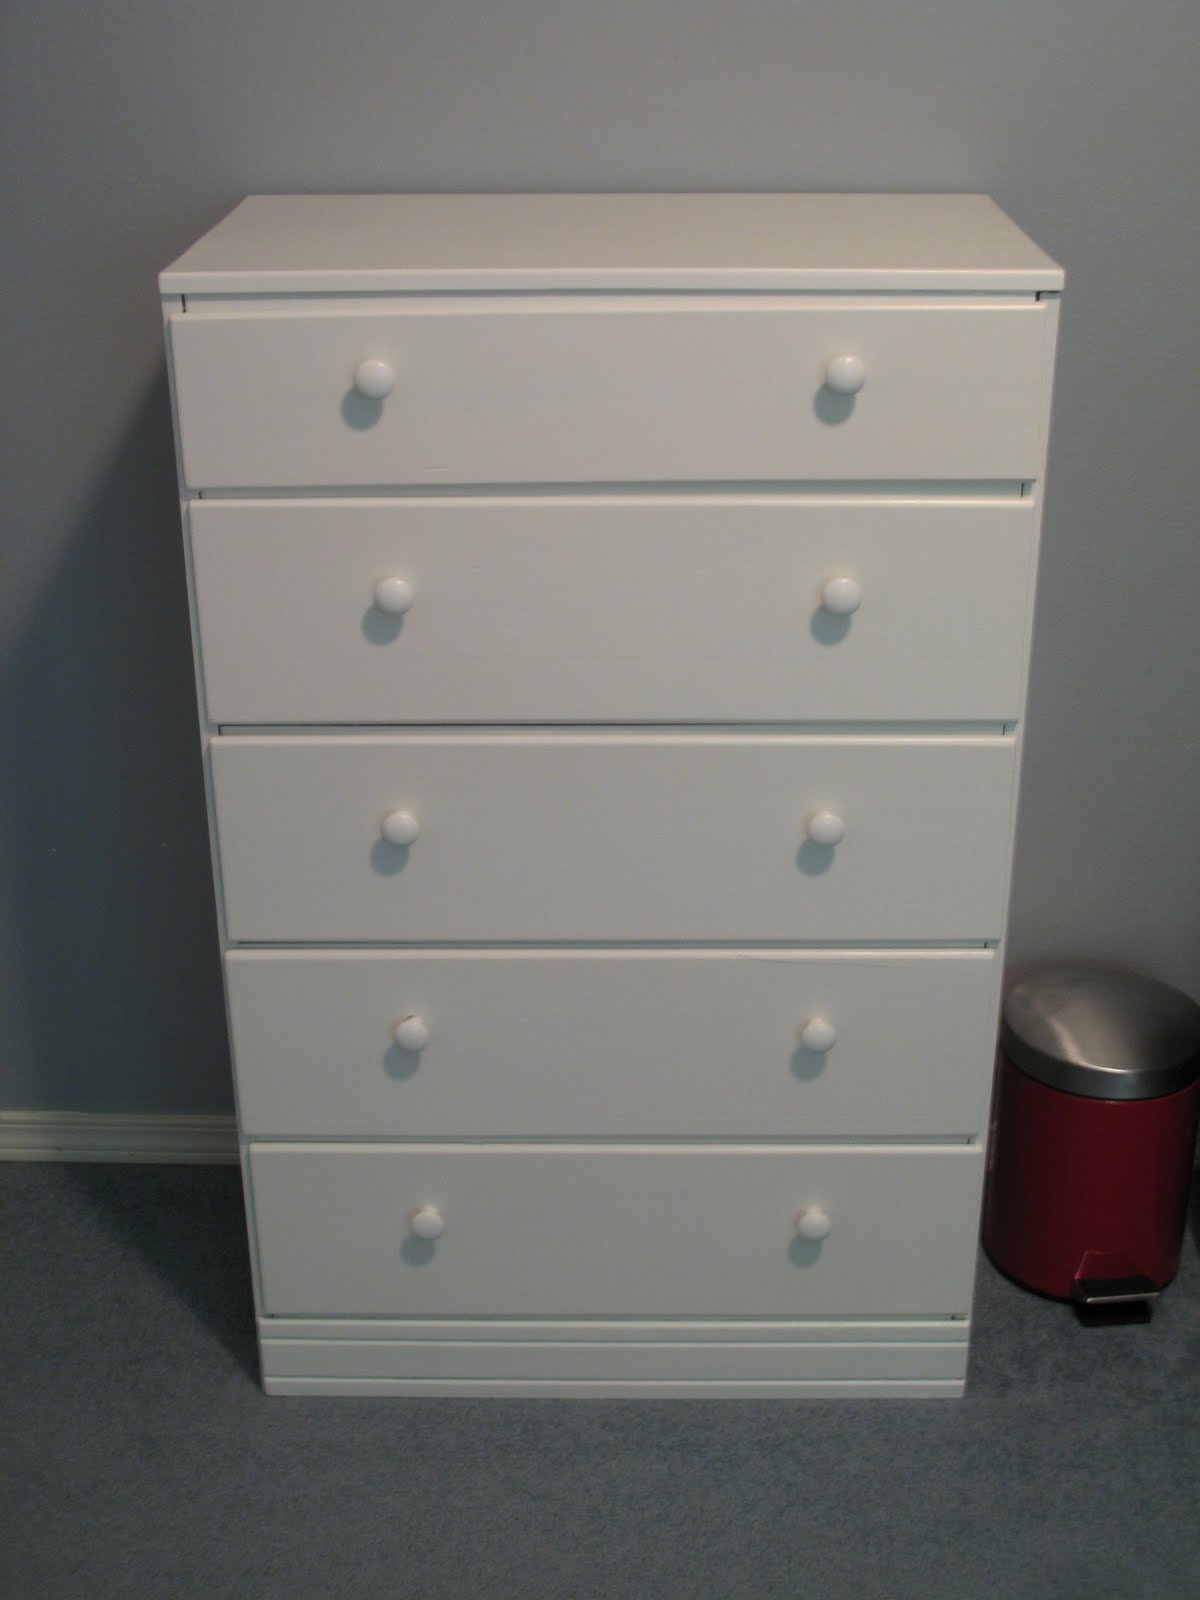
And here is the finished product.

One kids dresser all painted and ready to go!


Free is good!

Related Posts with Thumbnails